If you are interested in growing plants hydroponically, check out this post to learn how to make hydroponic system at home.
Materials
Hardware Store:
- 1 – 2 gallon bucket with lid (5 gallon buckets also work well)
- 1 – tube of 5-minute epoxy
- Liquid soluble fertilizer w/micronutrients
Pet Store:
- 1 – aquarium airstone (that fits inside the bucket)
- 1 – aquarium air pump
- 5+ ft – airline tubing
Internet:
- Netpots (buy a size several inches larger than your plant’s current root ball)
- Hydroton clay pebbles
Instructions
-
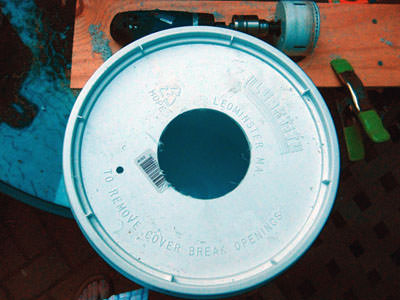
- Cut a circle in the lid (diameter should be 0.5″ less than the diameter of the desired netpot) using either an exacto knife or a hole saw and a drill, like this:
-
- Drill a small hole in the lid to allow airline tubing to be fed through ~ 1/4″ diameter
- Mix the epoxy and glue the airstone to the inside bottom of the bucket, wait for it to cure
- Feed air tubing through the small hole and connect to the airstone
- Fill the bucket with water + fertilizer according to package instructions
- Put plant roots in netpot and fill with hydroton/clay pebbles (I usually start my plants in peat pellets and then just put the whole peat pellet into the net pot and then fill to the brim with hydroton clay pebbles)
- Place netpot with plant into opening in lid and put lid on bucket
- Connect open end of air tubing to air pump.
- Plug in air pump
In order to protect the airpump from the weather, you may need to house it in a small rubbermaid bin. Tomato cages will fit perfectly around a 2-gallon bucket (just bend/cut the ends) This system can easily be expanded to utilize multiple buckets, simply get an air pump that has multiple outlet nozzles or a t-fitting and that is strong enough to supply as many buckets as you need.
Voila!


