I have two wonderful brothers that live much, much too far away. Ben is 26 and lives in Philadelphia where he works as a software programmer of some sort (what he does is completely over my head). David is 19 and in college in Vermont; he plans on becoming a Navy submarine officer. They’re both handsome, smart, funny, talented, all-around good guys.
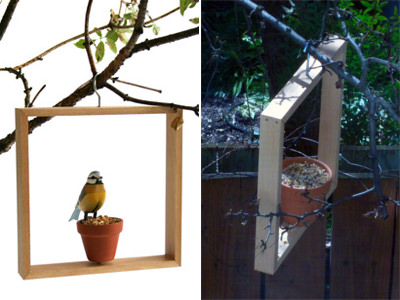
Anyway, back to balcony gardening. Ben gave me the idea for this post. He is quite the DIYer, and he saw this modern bird feeder designed by Nina Tolstrup and knew he could recreate it himself. Lucky for you, he sent me how he did it, so you can make this bird feeder too.
Materials:
- Approximately 5 feet of 1×2″ lumber
- 1 small terracotta pot (approximately 4 inches)
The hardware I had from previous projects:
- 8 x 1.5″ galvanized or rustproof finish nails
- 1 x 1.5″ long threaded bolt ~ 5/16″ diameter / hex hed ( hex head bolts have a shallow / flat head that is easy to conceal)
- 4 x washers (3/8″ inner diameter, 5/8″ outer diameter)
- 1 x nut (5/16″ diameter)
The hardware is pretty flexible you don’t have to use the exact same hardware I used. I’d test the hardware you have lying around at home before buying new.
Instructions:
- Cut 4 identical pieces of 1×2″ lumber with a miter saw at 45 degrees (I used 4 – 13″ pieces for mine). Make sure to cut them so that the “ramp” of the miter is on the 2″ wide side of the lumber; I call this side the face. Also make sure that both “ramps” are on the same face of each piece, like this:
/——————–\. - Drill a countersink part way through the face of one of the pieces. (deep enough and wide enough for the head of the bolt to fit in). Then drill 3/8″ wide hole through the countersink. This piece will be the bottom of the ‘frame’
- Nail and glue the 4 pieces together to make a square frame.
- Once the glue has dried, you can stain/seal/paint it. I sealed it with some linseed oil that I had lying around. Unless you use an ‘outdoor’ wood like cedar or redwood the wood will deteriorate if left untreated.
- Assemble the feeder pot. From the bottom (where you drilled the countersink hole). Put a small washer on the bolt, then insert the bolt into the hole. Then put a couple of spacer washers on the end of the bolt. Then place the terracotta pot over the bolt (through the drainage hole). Then one more washer and finally the nut, which can be hand tightened.
- Screw the screw hook into the center of the top (sometimes a pilot hole helps to get it started and a screwdriver can be used as a lever to help twist the hook into the wood)
- Fill the pot with seed and hang.

