As an Amazon Associate, we earn a small commission from qualifying purchases — at no extra cost to you.
I used to hate daylilies. The only one I knew was ‘Stella de Oro’ and it is completely over used in Southern California. Pretty much every shopping center here has a landscape full of them. But lately I’ve taken a second look. As I spend more time around all the awesome gardeners blogging about these things, I see that there is a whole world of daylilies that I didn’t know about.
But how do you grow daylilies in pots? I admit that I am a total daylily novice, so I turned to Hugh Stout, an iris and daylily hybridizer and grower, the American Hemerocallis Society, and several university extensions to find out.
When Should You Plant Daylilies?
In the North, you should buy daylilies in the Spring and plant them after your last frost. This will help your plants establish roots before winter. If you live in zone 6 or colder, your daylily will most likely die back in winter. You can either overwinter the plant in a sheltered place, like your garage, or you can mulch the pot with a layer of straw in late Autumn. Some daylilies are more sensitive to cold temperatures than others, so ask a knowledgeable nursery person or fellow gardener about specific varieties that do well in your climate.
In the South, you can plant daylilies either in the Spring or Fall. But avoid planting them when temperatures are over 90F because high temperatures can lead to rotting. I know that in Southern California, daylilies have lush foliage that does not die back in the winter, though it does look a little ragged.
Where Should You Place a Daylily Pot?
Daylilies will do best in full sun, however they will tolerate partial shade, though they may not flower as abundantly. A general rule of thumb is that the lighter colors (yellow, light pinks, peaches, etc) need full sun to bring out their best colors. Though the deeper colored flowers (reds and purples) will actually do better with a bit of shade during the afternoon.
What Type of Pot and Soil Should You Use?
Buy a high quality potting soil and organic compost. Amend the potting mix with the compost before planting. Daylilies like well drained, but moist soil that has good aeration and plenty of microbial activity. The compost will help improve the potting mix to provide an ideal situation for your plant. There are some potting soils that come pre-mixed with compost, if you have access to one of those, then it should be all that you need.
If your potting mix is having a hard time staying moist, Hugh recommends a product like “Soil Moist” or one of the similar polymer crystals that absorb water and release it back into the soil. Daylilies really need moist soil to produce the most/best quality blooms.
Choose a pot that is at least 12 inches in diameter and depth for smaller varieties, and 16 or 18 inches for larger varieties. It would probably be best to use a glazed pot or plastic, as terracotta dries out really quickly.
How to Plant a Daylily in a Container
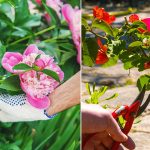
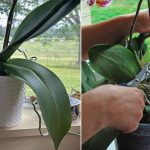
If you purchase a daylily through the internet/mailorder (as I recently did) you’ll receive a plant that is bareroot. To pot it up, make a mound of soil in the center of the pot. Set the plant in place with the roots spread on all sides of the mound. Add more potting soil until the white part at the base of the foliage is covered. Make sure that the point where foliage and roots join is no more than 1 inch below the surface of the soil. Firm the soil and water well.
If you buy a daylily that is already potted in a gallon (or larger) nursery pot, then repot it in your desired container so that the daylily is slightly above the soil line of the pot.
Caring For Your Daylily
Make sure that the soil is always moist (as wet as a wrung out sponge) during the spring and summer, when your plant is making scapes (flower stalks) and actually flowering. Too little water during this period will reduce the amount of flowers your plant will produce. Make sure to water deeply (i.e. until you see water flowing out the bottom of the pot), and try not to get water on the leaves or crown of the plant. Covering the surface of the pot with mulch can help cut down on the frequency of watering by reducing evaporation.
If you plant your daylily in Spring, you don’t need to fertilize it that first spring because most potting soils come pre-mixed with a fertilizer. Fertilize your plant for the first time during summer, when it is flowering. Look for a fertilizer that has a lower first number (nitrogen) than the second two numbers (phosphorus and potash). The following year, fertilize your plant in Spring, as the plant is starting to put out new growth, and again in summer. Go easy on the fertilizer!
If you remove spent flowers, you’ll encourage reblooming and keep your plant looking nicer. Always remove dead, damaged, or diseased foliage as soon as you see it. If you see any pests on your daylily, consult this information from the American Hemerocallis Society.
Hugh’s Favorite Miniature Daylilies
- BUMBLEBEE’S BANQUET – Light yellow red with deep rose red eyezone and green throat. Height 20″, bloom 3.12″.
- LITTLE MYSTIC MOON – Ruffled, ivory/cream flowers with green throat. Creates tons of flowers. Height 18″, bloom 2.75″.
- LEPRECHAUNS WEALTH – Orange/apricot flowers with olive green throat. Height 15″, bloom 2.5″.
- MINI PEARL – Blush pink with green lemon throat. Height 16″, bloom 3″.
Personally, I like ‘Jason Salter.’
Designing Container Combinations with Daylilies
If you love carefree, robust containers, check out this container design featuring daylilies, thistles, and grasses.